
Looking for an easy way to improve your backyard wildlife habitat? With $15 in lumber, basic woodworking tools and less than an hour of time, you can! How? When you build and install a nest box, you provide a critical habitat component for cavity-nesting birds – a place to conceal their nest!
Nest boxes don’t need to be overly creative or complex to be effective. In fact, The Noble Research Institute of Ardmore has developed a simple nest box construction plan using a single 1-by-6-inch board. We’ve included these plans and a step-by-step guide for constructing a “One-Board Nest Box” to get your next woodworking project under way!
- Supply List
(1) 1-by-6-inch cedar or exterior grade lumber (at least 55 inches long)
(15 to 20) 1-inch wood screws
(1) 2-inch nail
- Recommended Equipment
Pencil
Tape Measure
Hand Saw or Circular Saw
Phillips Screwdriver or Handheld Drill
Drill Bit, Phillips Attachment and Hole Saw
- Instructions to Build a Nest Box
Step 1: Measure Twice and Cut Once
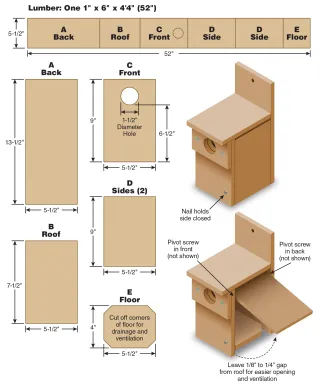
Follow the Noble Research Institute's construction plans to measure, mark and cut the seven pieces of the nest box. A circular saw can be used to cut the 1-by-6 board, or use a hand saw to add sweat equity to your nest box.
After the 1X6 is cut into the above pieces, measure 2.5 inches from the top of the front piece and drill a 1.5-inch entrance hole in the center of the board. Use a drill press or handheld drill with a hole-saw to cut the entrance hole. Then drill a similar hole in the center of the predator guard piece.
*Depending on the species you’re hoping to attract to your backyard, you can change the size of the entrance hole. Carolina chickadees will only need a 1.15-inch hole, while northern flickers use a 2.5-inch entrance hole. See the March/April 2015 issue of this magazine for more information about “Holes for Homes” including the preferred nest box dimensions of four popular cavity-nesting birds.
Step 2: Frame Your Nest Box
Image Jena Donnell/ODWC
Once the individual nest box pieces are cut to size, it’s time to temporarily frame the sides, floor, and back pieces.
We’ve found it’s easiest to build the nest box “face down.” Position the two side pieces (5.5 by 9 inches) so they are parallel on their edge about 4.5 inches apart on your workspace. Then fit the floor piece (5.5 by 13.5 inches) on top of the unattached side pieces. Try to center the back piece so there is a 1.75-inch space on each end. These spaces will be used to hang the finished project.
Since you’ll need to monitor your nest box and clean out any nesting material the following winter, the design allows one of the side pieces to be used as a hinged door. To allow for easier opening of the door, one side piece needs to be slightly offset. Adjust one side piece so that it is 1/8-inch to 1/4-inch lower than the corresponding side.
Step 3: Attach the Back to the Side Pieces
Image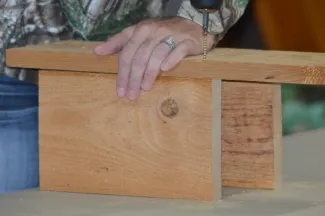 Jena Donnell/ODWC
Now that you’ve framed the project and slightly lowered one side piece, it’s time to attach the back to the side pieces. Fasten the slightly lowered door at the top using a single 1-inch wood screw, electric hand held drill or screwdriver. If a hand held drill and drill bit is available, consider pre-drilling a small hole for the wood screw.
With the door attached to the back piece with one screw, fasten the other side piece to the back with two 1-inch wood screws, one screw at each end.
Step 4: Attach the Floor to the Back and One Side Piece
Image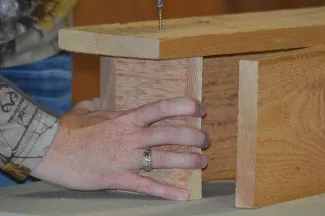 Jena Donnell/ODWC
With the sides secured to the back piece, fasten the floor to the back with a 1-inch wood screw. Then turn the nest box on its side so that the attached door is facedown. Use one 1-inch screw to fasten the floor to one side.
Step 5: Attach the Front
Image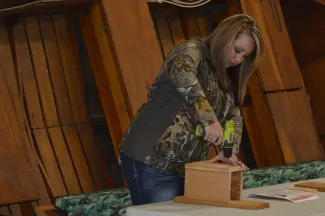 Jena Donnell/ODWC
With the back, side, floor and door attached, flip the nest box onto its back. Place the front piece onto the top of the attached sides. Then fasten the front piece to the slightly lowered door at the top with a single 1-inch wood screw, making sure the front screw aligns with the back screw and the door hinges correctly. Then fasten the front piece to the other side piece with two wood screws and to the floor with one wood screw.
Step 6: Attach the Roof
Image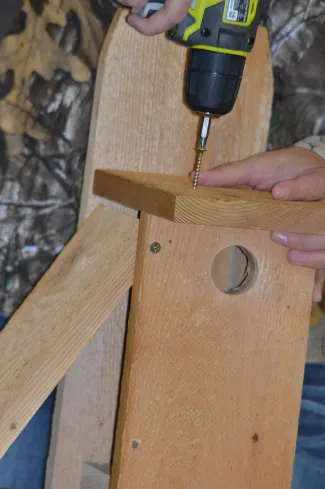 Jena Donnell/ODWC
Once the front piece is secured, turn the nest box upright and rest the floor of the nest box on your workspace; the back piece will overhang the side of the workspace. Then place and fasten the roof to the front piece with one wood screw and to one side with a single wood screw. Do not fasten the roof to the hinged door.
* The overhanging roof prevents water dripping into the box. Other ways to keep your nest box interior dry include cutting the corners from the floor of the box or drilling 3/8- inch drainage holes in the floor near each corner.
Step 7: Attach the Predator Guard
Image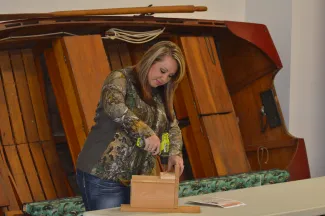 Jena Donnell/ODWC
Fasten the predator guard over the entrance hole of the front piece with two wood screws. This predator guard adds an extra inch of protection should a raccoon, feral cat or other nest predator attempt to rob the nest or prey on the incubating adult. Finally, drill a small hole through the bottom of the front piece and the hinged door at a 45-degree angle. Then place a 2-inch nail through the hole to secure the door in place.
Once the nest box is completed, the exterior wood can be painted in a light, neutral color, or left as-is. Install the nest box about 4 feet above the ground so that it can be easily monitored. Consider situating the nest box so the entrance hole faces in a northerly, easterly or northeasterly direction. This will keep sunlight from shining directly in hole during the afternoon, overheating the interior.